Spring简介
- 历史:
- 2002年,首次推出Spring框架的雏形:interface21框架
- 2004年3月24日,基于interface21框架,发布了Spring框架的1.0版本(本次学习使用的是Spring5)
- Spring Framework的创始人:Rod Johnson
- Spring理念:使现有技术更加容易使用,本身整合了现有的很多技术框架。
- SSH:struct2+Spring+Hibernate
- SSM:SpringMVC+Spring+Mybatis
- 官方文档
- 官网下载地址
- github地址
- maven坐标:
<!-- 安装这个包,会自动添加其它依赖的包-->
<dependency>
    <groupId>org.springframework</groupId>
    <artifactId>spring-webmvc</artifactId>
    <version>5.3.3</version>
</dependency>

<!-- 和mybatis整合需要的包 -->
<!-- https://mvnrepository.com/artifact/org.springframework/spring-webmvc -->
<dependency>
    <groupId>org.springframework</groupId>
    <artifactId>spring-jdbc</artifactId>
    <version>5.3.3</version>
</dependency>-
Spring优点:
- 是一个开源的免费的框架;
- 轻量级,非入侵式框架;
- 控制反转(IOC)
- 面向切面编程(AOP)
- 支持事务的处理
- 支持框架整合
-
缺点:配置繁琐
-
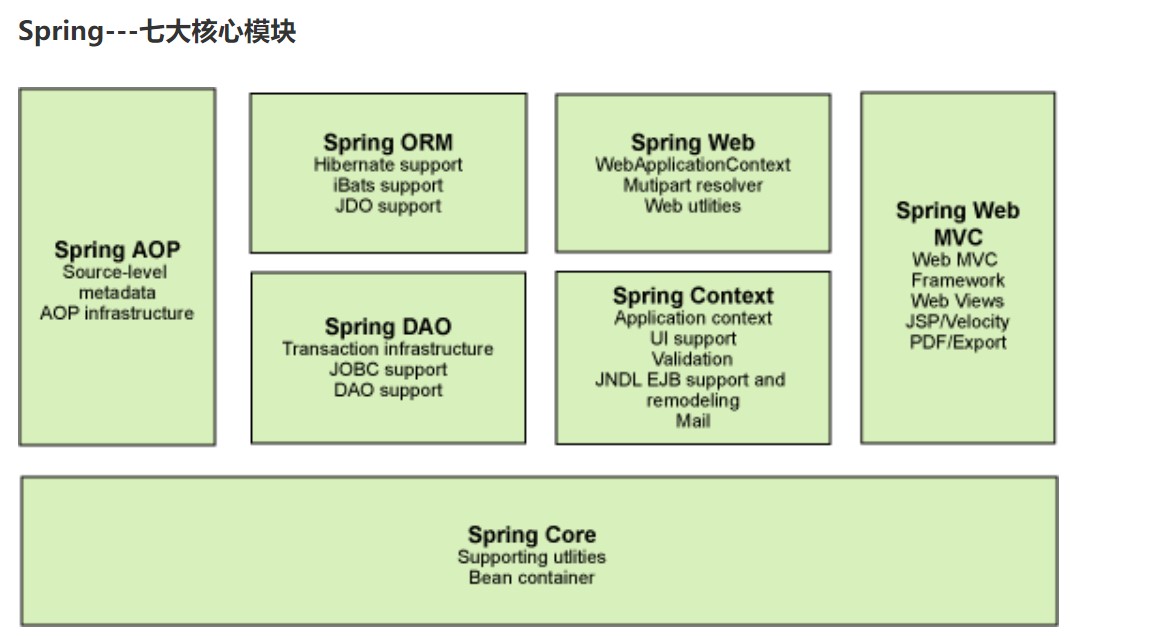
Spring的组成:
-
Spring的拓展:
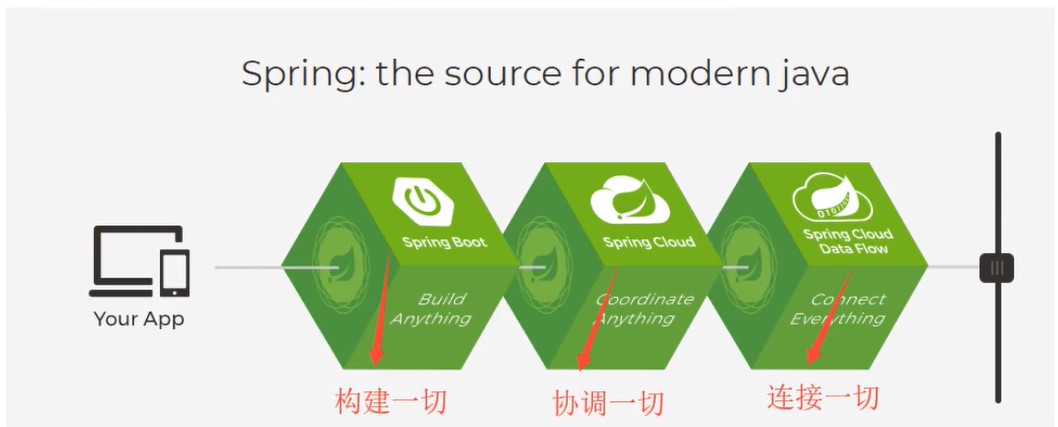
- SpringBoot:
- 一个快速开发的脚手架;
- 基于SpringBoot可以快速开发单个的微服务;
- 约定大于配置
- SpringCloud:
- SpringCloud是基于SpringBoot实现的。
- 学习SpringBoot的前提是Spring及SpringMVC
- SpringBoot:
IOC
IOC原型
- 普通接口实现:
package com.zestaken.service;

import com.zestaken.dao.UserDao;
import com.zestaken.dao.UserDaoImpl;

//在service层调用Dao层的方法进行业务操作
public class UserServiceImpl implements UserService{
    //直接在编写程序时写好UserDao属性
    private UserDao userDao = new UserDaoImpl();

    @Override
    public void getUsers() {
        userDao.getUsers();
    }
}- IOC注入思想实现:
package com.zestaken.service;

import com.zestaken.dao.UserDao;

public class UserServiceImpl implements UserService{
    //编写程序将UserDao对象设置为从外界获取注入的值,而不是直接由程序员设置
    private UserDao userDao;

    //注入UserDao的值
    public void setUserDao(UserDao userDao) {
        this.userDao = userDao;
    }

    @Override
    public void getUsers() {
        userDao.getUsers();
    }
}- 用普通的方法实现,每一次新增UserDao接口的实现类,都需要修改UserService实现类的代码。
- 普通实现方法:程序是主动创建对象,控制权在程序员的手上。
- IOC思想实现:使用set注入后,程序不再具有主动性,而是被动接受传递的对象。
- 优点:程序员不用再去管理对象的创建了,系统的耦合性大大降低。
IOC本质
- 控制反转(Inversion Of Control),是一种设计思想,DI(Dependency Injection,依赖注入)是实现IOC的一种方式。
- 未使用IOC思想的面向对象编程中,对象的创建和对象间的依赖关系,完全硬编码在程序中,对象的创建由程序自己控制,使用IOC思想后,对象的创建转移给第三方,控制反转即获得依赖对象的方式反转了。
- 控制反转是一种通过描述(XML或注解)并通过第三方去生产或获取特定对象的方式;
- 在Spring中实现IOC的是IOC容器,其实现方法是DI(依赖注入)。
Spring的IOC实现
- 书写接口实现类:
//Dao层实现
package com.zestaken.dao;

public class UserDaoImpl implements UserDao{
    @Override
    public void getUsers() {
        System.out.println("sql查询");
    }
}
//Service层实现
package com.zestaken.service;

import com.zestaken.dao.UserDao;

public class UserServiceImpl implements UserService{
    private UserDao userDao ;

    //注入UserDao的值
    //使用Spring管理的类的属性,必须由set方法设定
    public void setUserDao(UserDao userDao) {
        this.userDao = userDao;
    }

    @Override
    public void getUsers() {
        userDao.getUsers();
    }
}- 将实现类用xml的方式交给Spring管理
<?xml version="1.0" encoding="UTF-8"?>
<beans xmlns="http://www.springframework.org/schema/beans"
       xmlns:xsi="http://www.w3.org/2001/XMLSchema-instance"
       xsi:schemaLocation="http://www.springframework.org/schema/beans
        https://www.springframework.org/schema/beans/spring-beans.xsd">

<!--    在Spring中使用bean来创建对象,-->
<!--    id是该类生成的对象名,class是完全限定类名-->
    <bean id="userDaoImpl" class="com.zestaken.dao.UserDaoImpl"/>
    <bean id="userServiceImpl" class="com.zestaken.service.UserServiceImpl">
<!--        name指定需要赋值的属性 ref指定传递的对象-->
        <property name="userDao" ref="userDaoImpl"/>
    </bean>

</beans>- 测试:
package com.zestaken.service;

import org.junit.jupiter.api.Test;
import org.springframework.context.ApplicationContext;
import org.springframework.context.support.ClassPathXmlApplicationContext;

public class ServiceTest {
    @Test
    public void userServiceImplTest(){
        //获取Spring的上下文对象,参数是配置文件名
        ApplicationContext context = new ClassPathXmlApplicationContext("applicationContext.xml");
        //现在所有的对象都交由Spring管理了,要想使用对象,只需要从Spring中取出即可(Spring中这些对象叫做bean)
        UserServiceImpl userServiceImpl = (UserServiceImpl) context.getBean("userServiceImpl");
        //获取出对象之后,即可正常使用
        userServiceImpl.getUsers();
    }
}- 控制:传统的程序的对象是由程序本身控制创建的,使用Spring的对象是由Spring来创建的;
- 反转:程序本身不创建对象,而变成被动的接收对象。
- IOC即对象由Spring来创建,管理和装配。我们只需要修改相应的配置文件,例如此处由xml文件配置,则修改xml文件即可修改程序实现。
Spring中IOC创建对象的方式
- 通过类的无参构造方法类构造对象,默认使用这种。
- 使用有参的构造方法构造:
- 下标赋值:
<bean id="exampleBean" class="examples.ExampleBean"> <constructor-arg index="0" value="7500000"/> <constructor-arg index="1" value="42"/> </bean>- 类型赋值:
<bean id="exampleBean" class="examples.ExampleBean"> <constructor-arg type="int" value="7500000"/> <constructor-arg type="java.lang.String" value="42"/> </bean>- 参数名赋值(常用):
<bean id="exampleBean" class="examples.ExampleBean">
 <constructor-arg name="years" value="7500000"/>
 <constructor-arg name="ultimateAnswer" value="42"/>
</bean>
Spring配置
alias(别名)
- 如果配置了别名,我们也可以使用别名来获取到这个对象:
<alias name="userDaoImpl" alias="userDaoImpl2"/>Bean配置
- id:bean的唯一标识符,相当于对象名;
- class:bean对象所对应的类的完全限定类名
- name:也是别名,而且那么可以同时取多个别名,并且别名之间可以用空格,
,,;等来分隔 - 示例:
<bean id="userDaoImpl" class="com.zestaken.dao.UserDaoImpl" name="zhangjie lisi,zestaken;zhangsan"/>import配置
- 一般用于团队开发使用,可以将多个配置文件导入到一个配置文件从而合并为一个配置文件:
<import resource="bean1.xml"/>
<import resource="bean2.xml"/>
<import resource="bean3.xml"/>
依赖注入(DI)
一:构造器注入
- 构造器注入即有参数的构造方法来构造对象,在构造时将对象属性初始化。
- 三种方式:
- 下标赋值:
<bean id="exampleBean" class="examples.ExampleBean"> <constructor-arg index="0" value="7500000"/> <constructor-arg index="1" value="42"/> </bean>- 类型赋值:
<bean id="exampleBean" class="examples.ExampleBean"> <constructor-arg type="int" value="7500000"/> <constructor-arg type="java.lang.String" value="42"/> </bean>- 参数名赋值(常用):
<bean id="exampleBean" class="examples.ExampleBean">
 <constructor-arg name="years" value="7500000"/>
 <constructor-arg name="ultimateAnswer" value="42"/>
</bean>
二:setter方法注入
- 依赖:bean对象的创建依赖于容器;
- 注入:bean对象中的所有属性由容器来注入。
- 使用这种方式注入的属性,必须全部使用setter方法来设置属性。
- 不同类型的属性的注入方式不同:
- 基本类型以及String类型的注入:通过
value来实现
<property name="name" value="zhangjie"/>- bean类型注入(即属性类型是类类型,且这个类的实现对象必须在Spring中注册):使用
ref:
<bean id="address" class="com.zestaken.pojo.Address"/> <bean id="person" class="com.zestaken.pojo.Person"> <property name="address" ref="address"/> </bean>- 数组,list集合 map集合,set集合类型的注入,需要使用专门的标签:
<!-- 数组 --> <property name="books"> <array> <value>红楼梦</value> <value>西游记</value> </array> </property> <!--list集合 --> <property name="hobbys"> <list> <value>写代码</value> <value>看书</value> </list> </property> <!--map集合 --> <property name="card"> <map> <entry key="身份证" value="123435"/> <entry key="银行卡" value="2340273"/> </map> </property> <!--set集合 --> <property name="games"> <set> <value>lol</value> <value>csgo</value> <value>overwatch</value> </set> </property>- Properties类型的注入:
<property name="properties"> <props> <prop key="username">zhangjie</prop> <prop key="password">12435325</prop> </props> </property>- 赋值为null的注入:
<property name="girlfriend"> <null/> </property> - 基本类型以及String类型的注入:通过
三:c命名空间注入
- 对应构造器注入的方式,c命名空间相当于constructor-arg标签,所以必须有有参数的构造方法才能使用这种方式。
- 使用c命名空间,必须先导入对应的xml约束:
xmlns:c="http://www.springframework.org/schema/c"- 示例;
<!-- c-namespace declaration with argument names -->
   <bean id="beanOne" class="x.y.ThingOne" c:thingTwo-ref="beanTwo"
       c:thingThree-ref="beanThree" c:email="something@somewhere.com"/>
四:p命名空间注入
- 对应setter的注入方式,p命名空间相当于property标签,所以必须有setter方法才能使用这种方法。
- 使用p命名空间,也必须先导入相应的xml约束:
xmlns:p="http://www.springframework.org/schema/p"- 示例:
<bean name="p-namespace" class="com.example.ExampleBean"
    p:email="someone@somewhere.com"/>
Bean的作用域
- 单例模式:从一个bean中无论获取多少次获取的都是同一个对象。
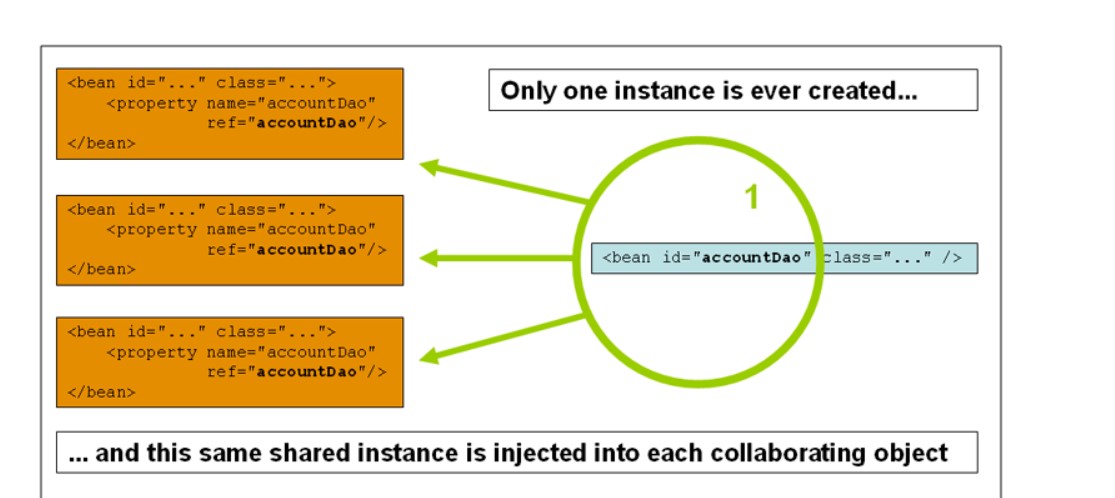
- 单例模式是bean的默认作用域,也可以显式设置:
<bean id="accountService" class="com.something.DefaultAccountService"/> <!-- the following is equivalent, though redundant (singleton scope is the default) --> <bean id="accountService" class="com.something.DefaultAccountService" scope="singleton"/> - 原型模式:每次从bean中获取的对象都是新的对象。
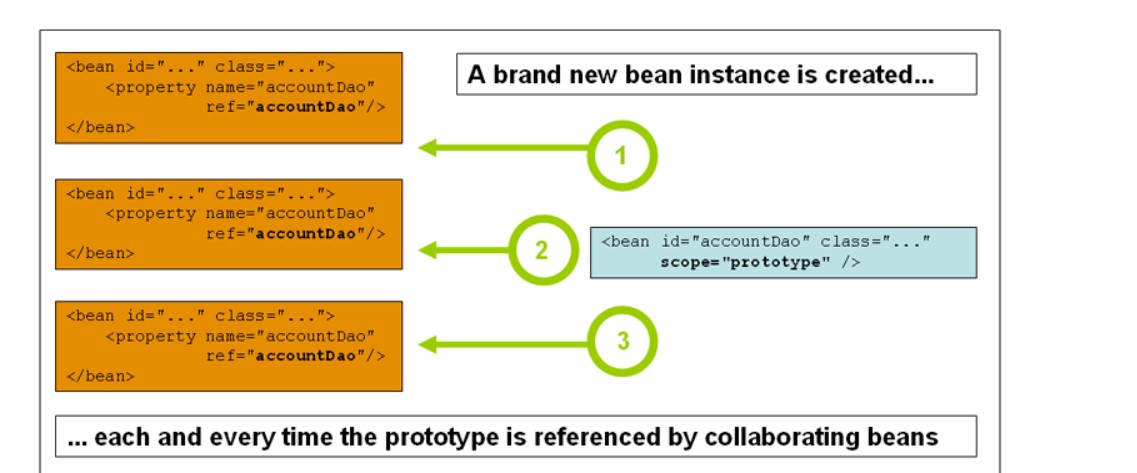
- 设置原型模式:
<bean id="accountService" class="com.something.DefaultAccountService" scope="prototype"/> - Request
- Session
- Application
- WebSocket (后面的四个都是在web开发中使用的)
Bean的自动装配
- 装配:有些对象的属性是另一个由Spring管理的对象,给这个属性赋值就是装配。所以不是所有由Spring管理的对象都需要装配。
- 自动装配:Spring会在上下文中自动寻找,并自动给bean装配属性。
- Spring中的三种装配方式:
- 在xml中显式的配置
- 在java中显式的配置
- 隐式的自动装配bean
- 自动装配的两种方式:
- byName:会自动在容器上下文中寻找id属性值和自己对象的set方法后面的名称相同的bean。
- 使用byName需要保证所有bean的id唯一,并且这个bean的id值需要和自动注入的属性的对应的set方法值一致。
- 示例:
<bean id="userServiceImpl" class="com.zestaken.service.UserServiceImpl" autowire="byName"> <!-- name指定需要赋值的属性 ref指定传递的对象--> <!-- <property name="userDao" ref="userDaoImpl"/> --> </bean>- byType:会自动在容器上下文中寻找和自己对象的类型相同的bean。
- 使用byType需要保证所有bean的class唯一,并且这个bean需要和自动注入的属性的类型一致。
- 示例:
<bean id="userServiceImpl" class="com.zestaken.service.UserServiceImpl" autowire="byType"> <!-- name指定需要赋值的属性 ref指定传递的对象--> <!-- <property name="userDao" ref="userDaoImpl"/> --> </bean> - byName:会自动在容器上下文中寻找id属性值和自己对象的set方法后面的名称相同的bean。
Spring注解开发
- 开启注解:
- 扫描包中的注解:如扫描
@Component注解<context:component-scan base-package="com.zestaken"/> - 配置注解的支持:
<context:annotation-config/>
- 扫描包中的注解:如扫描
- xml与注解优缺点:
- xml更加万能,维护更加方便;
- 注解需要能够修改类中的代码,维护相对困难;
- xml与注解配合使用:
- xml用来管理bean;
- 注解只负责属性注入,即
@Value。
注解注册bean
@Component注解:- 组件注解,==放在类上==,说明这个类被Spring管理了,即==注册lbean==;
- 自动注入的bean对象名是==类名的首字母小写==形成的。
- 等价于
<bean id="userDaoImpl" class="com.zestaken.dao.UserDaoImpl" />
@Component为mvc模式形成的衍生注解,这些==注解功能完全相同==,只是为了更好的区分架构层而使用:- dao层:
@Repository - service层:
@Service - controller层:
@Controller
- dao层:
注解注入属性
@Value("属性值")注解:- 在基本类型以及字符串类型对象上使用,为创建的对象的的对应属性赋值。
- 等价于
<property name="name" value="zestaken"/>
注解配置作用域
@Scope("作用域")注解:- 用于配置bean对象的作用域,如:
@Scope("prototype")
- 用于配置bean对象的作用域,如:
注解实现自动装配
- 注解使用配置:
- 导入约束:
xmlns:context="http://www.springframework.org/schema/context"http://www.springframework.org/schema/contexthttps://www.springframework.org/schema/context/spring-context.xsd"
2.配置注解的支持:<context:annotation-config/>
- 示例:
<?xml version="1.0" encoding="UTF-8"?> <beans xmlns="http://www.springframework.org/schema/beans" xmlns:xsi="http://www.w3.org/2001/XMLSchema-instance" xmlns:context="http://www.springframework.org/schema/context" xsi:schemaLocation="http://www.springframework.org/schema/beans https://www.springframework.org/schema/beans/spring-beans.xsd http://www.springframework.org/schema/context https://www.springframework.org/schema/context/spring-context.xsd"> <context:annotation-config/> </beans> - 导入约束:
@Autowired注解:- 使用该注解在类中需要导入包:
import org.springframework.beans.factory.annotation.Autowired;- 这个包需要在maven中配置导入。
- 直接在==属性==上使用即可,也可以在set方法上使用。
- 使用这个注解,可以==不用编写属性对应的set方法==。前提是要被装配的属性在Spring容器中存在。
- 配置注解
@Autowired(required = false)可以使属性可以为空,默认不能。与注解@Nullable作用相同。 @Autowird注解:会自动根据该属性的==类型或者名字==来自动装配;- 可以配合使用
@Qualifier(value = "属性名")来限定根据bean id的名字来装配。
- 可以配合使用
- 示例:
package com.zestaken.service; import com.zestaken.dao.UserDao; import org.springframework.beans.factory.annotation.Autowired; import org.springframework.beans.factory.annotation.Qualifier; public class UserServiceImpl implements UserService{ @Autowired @Qualifier(value = "userDaoImpl") private UserDao userDao ; //注入UserDao的值 //使用Spring管理的类的属性,必须由set方法设定 public void setUserDao(UserDao userDao) { this.userDao = userDao; } @Override public void getUsers() { userDao.getUsers(); } }- 使用该注解在类中需要导入包:
@Resource注解:@Resource注解是java==原生==的,无需导入包;@Resource相当于拥有@Autowired和@Qualifier两个注解的功能。- 直接使用该注解,和
@Autowired一样; - 该注解可以设置参数,限定查找的bean id属性名,如:
@Resource(name = "userDaoImpl").
使用Java来配置Spring
- 本质:使用一个java配置类通过注解的方式来完全取代xml配置文件。
- 配置类:
package com.zestaken.config;

import com.zestaken.dao.UserDao;
import com.zestaken.dao.UserDaoImpl;
import com.zestaken.service.UserService;
import com.zestaken.service.UserServiceImpl;
import org.springframework.context.annotation.Bean;
import org.springframework.context.annotation.Configuration;

@Configuration
public class AppConfig {

    @Bean
    public UserDao userDao() {
        return new UserDaoImpl();
    }

    @Bean
    public UserService userService() {
        return new UserServiceImpl();
    }
}@Configuration注解:在配置类上面使用,代表这是一个配置类。(这个配置类的底层实质也是一个被Spring容器管理的类)@Bean注解:类似xml文件中的bean标签的作用,用于设置bean对象的方法之上:- 这个==方法的名字,相当于bean对象中的id属性==;
- 这个==方法的返回值,相当于bean对象中的class属性==。
- 还有一些诸如扫描包,导入其它配置类的注解等。
- 被注册到Spring容器的类
//UserDao
package com.zestaken.dao;

import org.springframework.stereotype.Component;

@Component
public class UserDaoImpl implements UserDao{
    @Override
    public void getUsers() {
        System.out.println("sql查询");
    }
}

//UserService
package com.zestaken.service;

import com.zestaken.dao.UserDao;

import org.springframework.stereotype.Component;

import javax.annotation.Resource;

@Component
public class UserServiceImpl implements UserService{

    @Resource
    private UserDao userDao ;

    //注入UserDao的值
    //使用Spring管理的类的属性,必须由set方法设定
    public void setUserDao(UserDao userDao) {
        this.userDao = userDao;
    }

    @Override
    public void getUsers() {
        userDao.getUsers();
    }
}- 和普通注解开发一样。
- 测试:
package com.zestaken.service;

import com.zestaken.config.AppConfig;
import org.junit.jupiter.api.Test;
import org.springframework.context.annotation.AnnotationConfigApplicationContext;

public class ServiceTest {
    @Test
    public void  userServiceImplTest(){
        //获取Spring的上下文对象,此处使用AnnotationConfig
        AnnotationConfigApplicationContext annotationConfigApplicationContext = new AnnotationConfigApplicationContext(AppConfig.class);
        //现在所有的对象都交由Spring管理了,要想使用对象,只需要从Spring中取出即可(Spring中这些对象叫做bean)
        UserService userServiceImpl = (UserService)annotationConfigApplicationContext.getBean("userService");
        //获取出对象之后,即可正常使用
        userServiceImpl.getUsers();
    }
}- 获取上下文的方式:
AnnotationConfigApplicationContext annotationConfigApplicationContext = new AnnotationConfigApplicationContext(AppConfig.class);- 参数:参数是要使用的配置类的class属性值。
AOP
- AOP(Aspect Oriented Programming):面向切面编程,通过==预编译技术和运行期间动态代理==实现程序功能的统一维护的一种技术。
- Spring中AOP:
- AOP在Spring中的作用:
- 提供声明式事务:允许用户自定义切面。
Spring中AOP概念
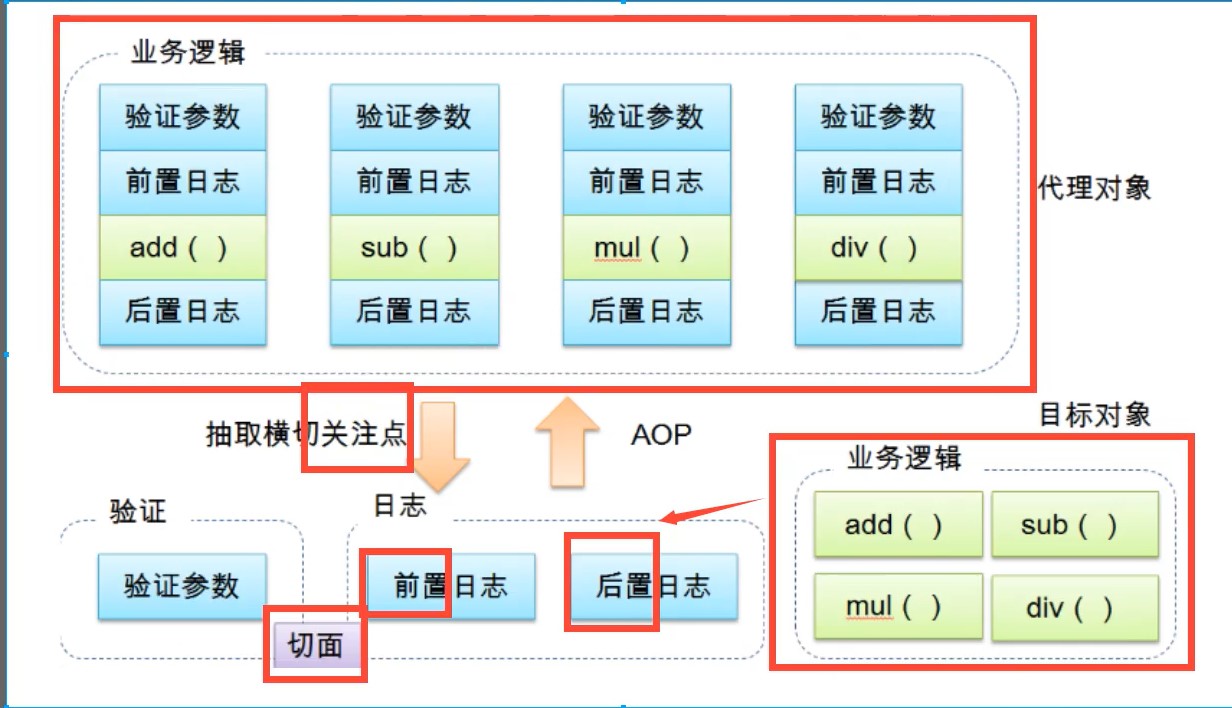
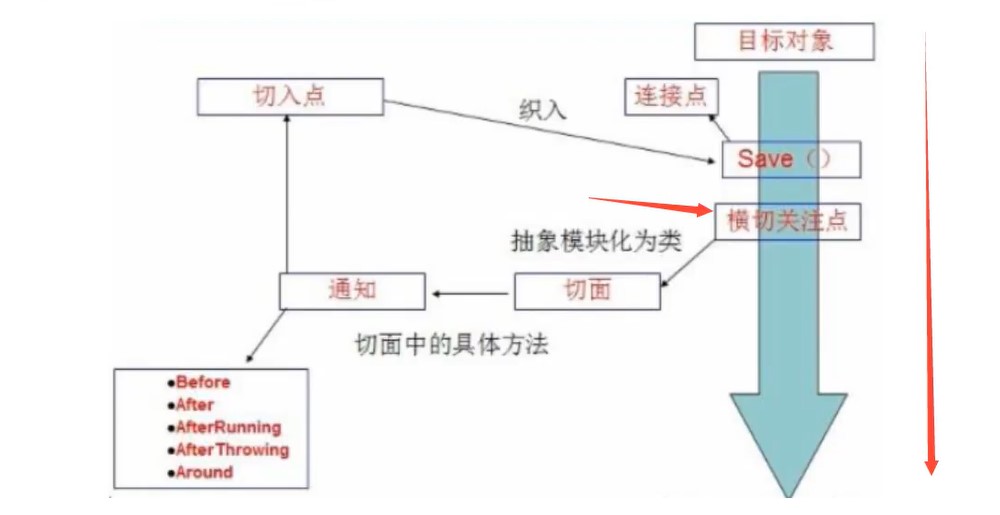
- 横切关注点:
- 跨越应用程序多个模块的方法或功能。
- 与我们业务逻辑无关的,但是需要我们关注的的部分,就是横切关注点,如日志,安全,缓存和事务等。
- 切面(Aspect):
- 横切关注点被模块化的特殊对象;
- 切面==是一个类==。
- 通知(Advice):
- 切面必须要完成的工作;
- ==通知是切面类中的一个方法==。
- Spring中支持五种类型的Advice:
- 前置通知:
- 连接点:方法前;
- 实现接口:
org.springframework.aop.MethodBeforeAdvice
- 后置通知:
- 连接点:方法后;
- 实现接口:
org.springframework.aop.AfterReturningAdvice
- 环绕通知:
- 连接点:方法前后;
- 实现接口:
org.aopalliance.intercept.MethodInterceptor
- 异常抛出通知:
- 连接点:方法抛出异常;
- 实现接口:
org.springframework.aop.ThrowsAdvice
- 引介通知:
- 连接点:类中增加新的方法属性。
- 实现接口:
org.springframework.aop.IntroductionInterceptor
- 前置通知:
- 目标(Target):
- 被通知的对象
- 代理(Proxy):
- 向目标对象应用通知之后创建的==对象==;
- 切入点(PointCut):
- 切面通知执行“地点”的定义;
- 连接点(JointPoint):
- 与切入点匹配的执行点。
- 与切入点匹配的执行点。
Spring实现AOP
- 不论采用何种方法,首先都需要先导入一个织入包:
<!-- https://mvnrepository.com/artifact/org.aspectj/aspectjweaver -->
<dependency>
    <groupId>org.aspectj</groupId>
    <artifactId>aspectjweaver</artifactId>
    <version>1.9.6</version>
</dependency>
方式一:使用Spring的API接口实现AOP
- 主功能的接口:
package com.zestaken.service;

public interface UserService {
    void add();
    void delete();
}- 实现主功能的类:
package com.zestaken.service;

public class UserServiceImpl implements UserService {
    @Override
    public void add() {
        System.out.println("add...");
    }

    @Override
    public void delete() {
        System.out.println("delete...");
    }
}- 在主功能的方法前加上日志的类:
package com.zestaken.log;

import org.springframework.aop.MethodBeforeAdvice;

import java.lang.reflect.Method;

public class Log implements MethodBeforeAdvice {
    @Override
    public void before(Method method, Object[] args, Object target) throws Throwable {
        System.out.println(target.getClass().getName()+"的"+method.getName()+"方法被执行了");
    }
}- before方法的参数:
- method:要执行的目标对象的方法
- args:要执行的目标方法的参数
- target:目标对象
- 要增加到切点的的类,应该==根据这个类中方法插入的位置,来实现不用的Spring的aop的API接口==.
- 在applicationContext.xml文件中==注册主功能类和增加日志方法的类,并配置aop==:
<?xml version="1.0" encoding="UTF-8"?>
<beans xmlns="http://www.springframework.org/schema/beans"
       xmlns:xsi="http://www.w3.org/2001/XMLSchema-instance"
       xmlns:aop="http://www.springframework.org/schema/aop"
       xsi:schemaLocation="http://www.springframework.org/schema/beans
        https://www.springframework.org/schema/beans/spring-beans.xsd
        http://www.springframework.org/schema/aop
        https://www.springframework.org/schema/aop/spring-aop.xsd">

<!--    注册主功能类和增加日志功能的类-->
    <bean id="userServiceImpl" class="com.zestaken.service.UserServiceImpl"/>
    <bean id="log" class="com.zestaken.log.Log"/>

<!--    配置aop,需要导入约束-->
    <aop:config>
<!--        配置切入点-->
<!--        id是切入点的名字-->
<!--        expression描述切入点的位置,使用execution表达式,execution表达式的格式为(修饰词,返回值,类名,方法名,参数)-->
        <aop:pointcut id="pointcut1" expression="execution(* com.zestaken.service.UserService.*(..))"/>
<!--        配置增加到切入点的方法-->
        <aop:advisor advice-ref="log" pointcut-ref="pointcut1"/>
    </aop:config>

</beans>- 导入的约束:
xmlns:aop="http://www.springframework.org/schema/aop"http://www.springframework.org/schema/aophttps://www.springframework.org/schema/aop/spring-aop.xsd
- excution表达式描述切入点的位置,==其中可以用
*通配符来表示适用于各种修饰词,返回值,方法名,用(..)表示方法的任何参数==。 - 测试aop:
import com.zestaken.service.UserService;

import org.junit.jupiter.api.Test;
import org.springframework.context.ApplicationContext;
import org.springframework.context.support.ClassPathXmlApplicationContext;

public class MyTest {
    @Test
    public void aopTest() {
        //获取配置文件生成上下文对象
        ApplicationContext classPathXmlApplicationContext = new ClassPathXmlApplicationContext("applicationContext.xml");
        //获取接口
        UserService userService = (UserService)classPathXmlApplicationContext.getBean("userServiceImpl");
        //测试方法
        userService.add();
        userService.delete();
    }
}- ==注意:aop的本质是动态代理,动态代理的是接口,所以从容器中获取出来的应该是接口类型的对象==。
方法二:自定义方法实现AOP
- 主功能类与接口不变。
- 在主功能类前增加日志功能的类:
public class Log {
    void before(){
        System.out.println("before....");
    }
}- ==无需实现接口==,只是一个普通的类。
- 配置文件:
<aop:config>
    <aop:aspect ref="log">
        <aop:pointcut id="pointcut2" expression="execution(* com.zestaken.service.UserServiceImpl.*(..))"/>
        <aop:before method="before" pointcut-ref="pointcut2"/>
    </aop:aspect>
</aop:config>- 在类注册好,以及导入必须的约束的情况下,修改aop的配置。
<aop:aspect>标签中,用==属性ref设置需要放入切面的方法==<aop:pointcut>标签中,正常设置切入点。<aop:before>以及<aop:after>等标签设置将绑定的方法==放入哪个位置,以及放入的方式==。
方法三:使用注解实现AOP
- 只修改实现增强功能的类以及xml文件。
- 实现增强功能的类:
import org.aspectj.lang.annotation.Aspect;
import org.aspectj.lang.annotation.Before;

@Aspect
public class Log {

    @Before("execution(* com.zestaken.service.UserServiceImpl.*(..))")
    void before(){
        System.out.println("before....");
    }
}@Aspect注解:表示该类是用于切面的增强功能的类。@Before注解:表示切入的方式,参数是切入点的位置。- 可以有多种切入方式。如
@After,@Around等。
- 可以有多种切入方式。如
- 可以给通知方法传递参数**
ProceedingJoinPoint joinPoint连接点对象**,作用是获取切入点的信息。如方法名之类的。 - xml配置文件:==省去aop配置,开启aop的注解功能==。但是aop的相关约束还是要有。
<aop:aspectj-autoproxy proxy-target-class="false"/>- 在注册了相关的bean之后,再开启aop的注解。
- aop的动态代理默认是用jdk方式实现的 ,将proxy-target-class属性设为true会改为使用cglib实现。
- proxy-target-class属性可以省略,这样默认使用jdk方式。
Spring整合Mybatis
导入相关jar包
- junit
<dependency>
    <groupId>junit</groupId>
    <artifactId>junit</artifactId>
    <version>4.13</version>
    <scope>test</scope>
</dependency>- mybatis
<dependency>
    <groupId>org.mybatis</groupId>
    <artifactId>mybatis</artifactId>
    <version>3.5.6</version>
</dependency>- mysql数据库
<dependency>
    <groupId>mysql</groupId>
    <artifactId>mysql-connector-java</artifactId>
    <version>8.0.23</version>
</dependency>- Spring基本包
<dependency>
    <groupId>org.springframework</groupId>
    <artifactId>spring-webmvc</artifactId>
    <version>5.3.3</version>
</dependency>- Spring的AOP织入包
<dependency>
    <groupId>org.aspectj</groupId>
    <artifactId>aspectjweaver</artifactId>
    <version>1.9.6</version>
</dependency>- Spring操作数据库必须的包
<dependency>
    <groupId>org.springframework</groupId>
    <artifactId>spring-jdbc</artifactId>
    <version>5.3.4</version>
</dependency>- 整合Mybatis和Spring的包:mybatis-spring
<dependency>
    <groupId>org.mybatis</groupId>
    <artifactId>mybatis-spring</artifactId>
    <version>2.0.6</version>
</dependency>
Spring整合Mybatis方式一
- 编写Spring对Mybatis的配置文件:
<?xml version="1.0" encoding="UTF-8"?>
<!--suppress ALL -->
<beans xmlns="http://www.springframework.org/schema/beans"
       xmlns:xsi="http://www.w3.org/2001/XMLSchema-instance"
       xsi:schemaLocation="http://www.springframework.org/schema/beans
        https://www.springframework.org/schema/beans/spring-beans.xsd">
<!--    注册DataSource 使用Spring的提供的JDBC来替换Mybatis的数据源配置-->
    <bean id="dataSource" class="org.springframework.jdbc.datasource.DriverManagerDataSource">
        <property name="driverClassName" value="com.mysql.cj.jdbc.Driver"/>
        <property name="url" value="jdbc:mysql://localhost:3306/youth_study"/>
        <property name="username" value="root"/>
        <property name="password" value="root"/>
    </bean>

<!--    sqlSessionFactory-->
    <bean id="sqlSessionFactory" class="org.mybatis.spring.SqlSessionFactoryBean">
        <property name="dataSource" ref="dataSource"/>
<!--        绑定Mybatis的配置文件,使这两个配置文件同时作用,各自负责一部分配置-->
        <property name="configLocation" value="classpath:mybatis-config.xml"/>
        <!-- 绑定mapper.xml文件,起到注册mapper的作用 -->
        <property name="mapperLocations" value="classpath:com/zestaken/dao/T_collegeMapper.xml"/>
    </bean>

<!--    sqlSessionTemplate:就是实际使用的sqlSession-->
    <bean id="sqlSessionTemplate" class="org.mybatis.spring.SqlSessionTemplate">
<!--        只能使用构造器注入sqlSessionFactory,因为没有set方法-->
        <constructor-arg index="0" ref="sqlSessionFactory"/>
    </bean>
</beans>- 这是一个Spring配置文件,==Spring配置文件的约束要有==。
- 配置数据源(datasource):使用
org.springframework.jdbc.datasource.DriverManagerDataSource类。具体配置与mybatis一样。 - 配置sqlSessionFactory:
- 使用
org.mybatis.spring.SqlSessionFactoryBean类; - 配置使用的数据源;
- 导入mybatis本来的配置;
- 导入mapper的配置。
- 使用
- 配置sqlSessionTemplate:
- 使用
org.mybatis.spring.SqlSessionTemplate类; - 用以==取代原来的sqlSession对象。
- 向sqlSessionTemplate==注入sqlSessionFactory==,并且只能使用构造器注入,因为没有set方法。
- 使用
- 将mapper实现类注册为bean:
- ==将sqlSessionTemplate==注入到mapper实现类中去。
- 编写mapper实现类
package com.zestaken.dao;

import com.zestaken.pojo.T_college;

import org.mybatis.spring.SqlSessionTemplate;

import java.util.List;

public class T_collegeMapperImpl implements T_collegeMapper {

//    需要导入包,SqlSessionTemplate模板或得sqlSession来执行操作
    private SqlSessionTemplate sqlSession;

//设置sqlSession的set方法,方便Spring的注入
    public void setSqlSession(SqlSessionTemplate sqlSession) {
        this.sqlSession = sqlSession;
    }


    public List<T_college> getT_collegeList() {
        T_collegeMapper t_collegeMapper = sqlSession.getMapper(T_collegeMapper.class);
        List<T_college> t_collegeList = t_collegeMapper.getT_collegeList();

        return t_collegeList;
    }
}- 这个实现类需要实现mapper接口中的方法;
- 同时==还需创建SqlSessionTemplate属性,并设置它对应的set方法==。
SqlSessionTemplate属性需要导入包:org.mybatis.spring.SqlSessionTemplate
- 相当于将==实际使用时获取mapper,执行对应sql语句的步骤直接放到这个实现类中去完成==,实际使用的时候,只需==获取该实现类的bean,调用相应的方法即可==。
4.Spring配置文件:
<?xml version="1.0" encoding="UTF-8"?>
<!--suppress ALL -->
<beans xmlns="http://www.springframework.org/schema/beans"
       xmlns:xsi="http://www.w3.org/2001/XMLSchema-instance"
       xsi:schemaLocation="http://www.springframework.org/schema/beans
        https://www.springframework.org/schema/beans/spring-beans.xsd">
<!--将数据库操作实现类注册到Spring-->
    <bean id="t_collegeMapperImpl" class="com.zestaken.dao.T_collegeMapperImpl">
        <property name="sqlSession" ref="sqlSessionTemplate"/>
    </bean>
</beans>- mybatis-config.xml配置文件:
<?xml version="1.0" encoding="UTF-8" ?>
<!DOCTYPE configuration
        PUBLIC "-//mybatis.org//DTD Config 3.0//EN"
        "http://mybatis.org/dtd/mybatis-3-config.dtd">
<!-- 核心配置文件 -->
<configuration>

</configuration>- 测试:
@Test
public void getT_collegeListTest(){
    ClassPathXmlApplicationContext classPathXmlApplicationContext = new ClassPathXmlApplicationContext("spring-dao.xml");
    T_collegeMapper t_collegeMapperImpl = classPathXmlApplicationContext.getBean("t_collegeMapperImpl", T_collegeMapper.class);

    List<T_college> t_collegeList = t_collegeMapperImpl.getT_collegeList();
    for(T_college college : t_collegeList){
        System.out.println(college);
    }
}- Spring整合Mybatis的常用配置方法:
- mybatis自己的配置文件(一般是mybatis-config.xml)中只放别名和设置的配置;(==将与Spring对Mybaits的配置相同的配置全部移除,如数据源配置,mapper注册等==)
- 关于Spring的Mybatis配置单独创建一个Spring配置文件来管理;
- Spring自己的配置(如注册bean等)用一个单独的Spring配置文件来管理。
Spring整合Mybatis方式二
- 在方式一的基础上==只对mapper实现类获取SqlSessionTemplate的方式作了简化==;
- mapper实现类:
package com.zestaken.dao;

import com.zestaken.pojo.T_college;

import org.apache.ibatis.session.SqlSession;
import org.mybatis.spring.support.SqlSessionDaoSupport;

import java.util.List;

public class T_collegeMapperImpl extends SqlSessionDaoSupport implements T_collegeMapper {

    public List<T_college> getT_collegeList() {
        SqlSession sqlSession = getSqlSession();
        T_collegeMapper t_collegeMapper = sqlSession.getMapper(T_collegeMapper.class);
        List<T_college> t_collegeList = t_collegeMapper.getT_collegeList();

        return t_collegeList;
    }
}- mapper实现类需要==继承SqlSessionDaoSupport类==,使用这个类需要导入包:
org.mybatis.spring.support.SqlSessionDaoSupport - 实现类==无需再设置SqlSessionTemplate属性==,可以直接通过==getSqlSession方法获取SqlSessionTemplate对象==。
- mapper实现类注册bean
<!--将数据库操作实现类注册到Spring-->
    <bean id="t_collegeMapperImpl" class="com.zestaken.dao.T_collegeMapperImpl">
        <property name="sqlSessionFactory" ref="sqlSessionFactory"/>
</bean>- 虽然无需再向mapper实现类中注入sqlSessionTemplate,但是需要==注入sqlSessionFactory==,用来产生SqlSessionTemplate对象。
Spring中事务管理
- 事务(Transaction):把一组业务绑在一起,看成一个业务,这些业务当且仅当所有业务都执行成功时,每一个业务才能成功执行,只要有一个业务没有成功,那么最后,所有业务都是失败的结果。
- 事务作用:确保数据的完整性与一致性。
- 事务的ACID属性:
- 原子性(atomicity)。一个事务是一个不可分割的工作单位,事务中包括的操作==要么都做,要么都不做==。
- 一致性(consistency)。事务必须是使数据库从一个一致性状态变到另一个一致性状态。一致性与原子性是密切相关的。
- 隔离性(isolation)。一个事务的执行不能被其他事务干扰。即一个事务内部的操作及使用的数据对并发的其他事务是隔离的,==并发执行的各个事务之间不能互相干扰==。
- 持久性(durability)。持久性也称永久性(permanence),指一个事务一旦提交,它对数据库中数据的改变就应该是永久性的。接下来的其他操作或故障不应该对其有任何影响。
- Spring支持两种事务:
- 声明式事务(又称交由容器管理事务);
- 编程式事务:在程序中通过try/catch实现事务。
声明式事务配置
- 在Spring对Mybatis的配置文件中==开启声明式事务==:
<!--    配置声明式事务-->
    <bean id="transactionManager" class="org.springframework.jdbc.datasource.DataSourceTransactionManager">
        <property name="dataSource" ref="dataSource"/>
</bean>- 需要给transactionManger==注入datasource数据源==。
- 结合AOP实现事务的织入:
<!--    结合aop实现事务的织入-->
<!--    配置事务通知-->
    <tx:advice id="txAdvice" transaction-manager="transactionManager">
<!--        给具体的方法配置事务-->
<!--配置每个方法事务的特性,如传播性propagation-->
        <tx:attributes>
            <tx:method name="getT_collegeList" propagation="REQUIRED"/>
        </tx:attributes>
    </tx:advice>

<!--    配置事务切入-->
    <aop:config>
        <aop:pointcut id="txPointCut"  expression="execution(* com.zestaken.dao.*.*(..))"/>
        <aop:advisor advice-ref="txAdvice" pointcut-ref="txPointCut"/>
</aop:config>- 配置事务通知(即使用tx标签)需要导入tx的约束:
xmlns:tx="http://www.springframework.org/schema/tx"http://www.springframework.org/schema/txhttp://www.springframework.org/schema/tx/spring-tx.xsd
- 给具体的方法配置事务:
- 以后在切入点,只要==方法名和配置相同的方法,就会被配置上事务==。
- 配置事务的切入:
- 通过切入的方式,使事务在具体的位置生效。
- 最终效果:
- 一个配置了事务的方法中,对数据库的操作中,只要有一个失败了,其余的所有操作都不会生效。